In the following tutorial I will show you how to create cool and bright graffiti arrows in Adobe Illustrator. You will learn how to create wild styled graffiti design elements using the Paintbrush Tool first (for sketching) and the Pen Tool (making forms and colors). Lets fun!
1. Create a Sketch
Step 1
As always, I'm using my Wacom Tablet to create a sketch right in Adobe Illustrator. It helps me bring together my design a lot more fluidly. The main goal of sketching is to get a good balanced composition. Don't worry about details when you're sketching. Free your hand and your mind. Let's create a Calligraphic Brush and enjoy sketching.

First make a few curve lines. Choose the place where your graffiti arrows will come from and draw smooth wave form lines. Two or three lines will be central in the composition. And other lines will be supporting and helping to make a good composition. Add arrow heads to the main lines to give direction. After you have the main guide lines let's make the arrows three-dimensional Use your imagination. Add some details.

One thing good to know about a wild style graffiti arrows is you need pronounced perspective. In one place arrows have to be in the distance, have to be much smaller (in the place where they are coming from). And in another place they should be much closer and larger. Let this visual effect be even a little overdone. It's good to get a wild effect.

Step 2
When your sketch is finished convert it to JPG format and paste it on a specialTemplate layer. Double-click on the layer with the pasted JPG sketch and set up the checkbox Template. Now it's locked and transparent.

2. Begin Tracing From the Sketch
Step 1
Create New Layer and put it above the "Sketch" layer. Lets give it a name "Lines".

Step 2
Now let's take the Pen Tool (P) and make clean and smooth outlines.

To create pretty curves make sure you've not added too many anchor points. Work clean and accurate.

One more important note to make is to make sure that all of your lines are intersecting and there are no gaps.

Step 3
Now we have our outlines created.

Let's duplicate this layer and hide the lower one. Here on a new layer select all the outlines and expand them by going to Object > Expand.

Step 4
Keeping selected all expanded lines, go to the Pathfinder panel and click Unite. Now we have one solid vector object.

If you have extra points or ugly lines fix it with Direct Selection Tool (A) and Pen Tool (P).

Step 5
OK, now let's take the Live Paint Bucket (K) and choose a bright fill color in theSwatch panel. Select your black outlined solid object and fill all the top surfaces of arrows.

Then choose another color and fill all the bottom surfaces of the graffiti arrows.

After you filled all the pieces, Expand all and Ungroup.

3. Add Colors
Step 1
OK, now the fun begins. Remember: choose clean, bright and contrasting colors. It has to be wild and bright. I decided to choose blue, yellow, green and silver as the main colors of the artwork. So let's play with these colors using the Gradient Tool (G).

I filled the first big arrow with three gradient sliders with these colors:
#00FFFF,#1C75E7, #A638F2. But feel free to use your own colors.Step 2
Continue to fill the other shapes, but don't forget about light and shades and where the light source is coming from. I decided the light will come from middle top. And now I know how to put gradients in this way.

Fill the green, yellow, and silver areas, still keeping in mind the source of light.

When you finish filling all the shapes, there will be bright contrast, three-dimensional artwork.

4. Add Highlights
I love this part of the process because highlights are always give a nice visual effect. All that was looking poor and flat before - becomes alive. Highlights are very important. Especially in graffiti.
Step 1
What is the main goal of highlights? To make contrasts more powerful. So let's take thePen Tool (P) and create a thin white shape on the corners and edged areas of the arrows.

Step 2
Copy and paste the bottom shape (blue arrow). Select it with the highlight shape (white one) and press the Intersect button in Pathfinder panel.

Use this method to get highlights in another places. Somewhere they would not be as very intensive (use another colors than white; or drop down the level of transparency).

5. Add Extra Shadows and Reflections
We already have shades in gradients, but somewhere we need to enhance the depth with extra shading shapes.
Step 1
Let's use the way I described above to create shadows shapes.

Use solid colors or gradients. Play with Blending Modes (sometimes you can useMultiply for deep shades). If some shadows overlap your highlights just place them below those shapes with Control-[.

Step 2
To make our graffiti arrows more tasty, let's give them reflections here and there. Just add shapes that have a bit lighter fill or gradient. Again feel free to play with Blending Modes and Opacity.

Step 3
Copy and paste all the elements, group them and fill with a black color. Put it in the background (Control-Shift-[). And now we have got some kind of shadow. I scaled this one a little bit horizontally as you can see.

Step 4
Let's add some details. Some extra lines and circles to add further detailing to your artwork.


Now we have got a cool graffiti, wild-style arrows. I love it. Let's finalize it with background elements.
6. Add Background Elements
Step 1
Create New Layer below. There we will put some black background elements. I like to reuse old vector shapes. You can use your own, just find something wild, sharp and angular.

Step 2
If you have not any old useful graffiti shapes you can create it right here on this layer. Again feel free and work creative, make some corners, arrows and etc.

I added more details: stars, circles and halftone elements there. I also distorted all the artwork to create a better composition. I also filled the background with a grey color.

Now we have a great, wild-style, graffiti graphic! Love it!
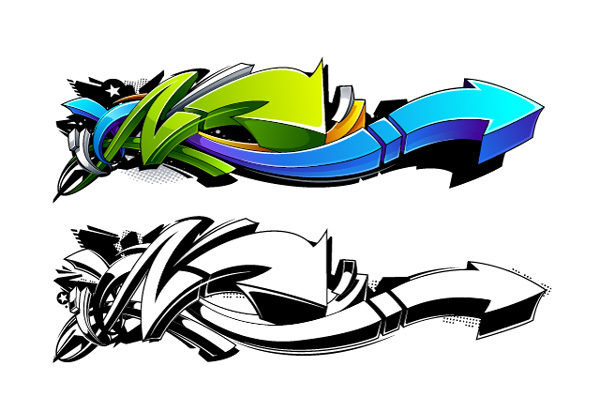
7. Create a Monochrome Version
I also want to show you how to create black and white version of this graffiti art. It can be very useful.
Step 1
Select all the top surfaces of graffiti arrows. All except the shadows. And fill all selected with a white color. Use your intuition to work out exactly what has to be white and what has to be black.

Step 2
Now select all the bottom surfaces of the arrows and shadows. And fill them with black color.

Step 3
Finally select all the highlights. And fill them with white. Maybe somewhere you will need extra highlights and shadows.

This is what we have in the end.

Awesome Work!
I love this style of artwork and I hope you have too. It can be very useful for creating unique looking graphics.
|
| Sumber : tutsplus |


0 komentar:
Posting Komentar
Masukkan komentar anda. Bookmark halaman kami jika anda ingin melihat posting selanjutnyan :)